DIY: Holiday Sequins Pencil Skirt and Tips for Sewing w/ Sequins

Hello Everyone!

I pray all is well with you.  It is December already and no doubt many of you have holiday office parties to attend.  I’ll be honest with you.  I can’t remember the last time I went to a holiday party and I have never worn sequins prior to today’s post.

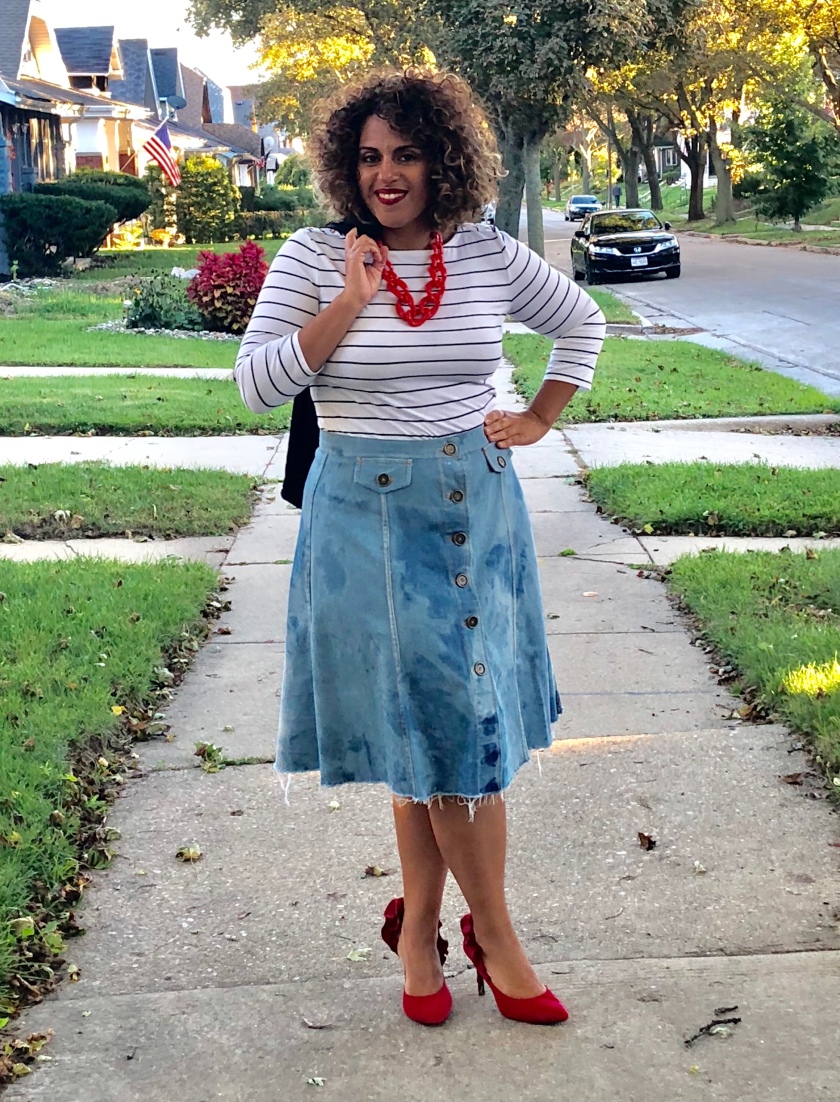
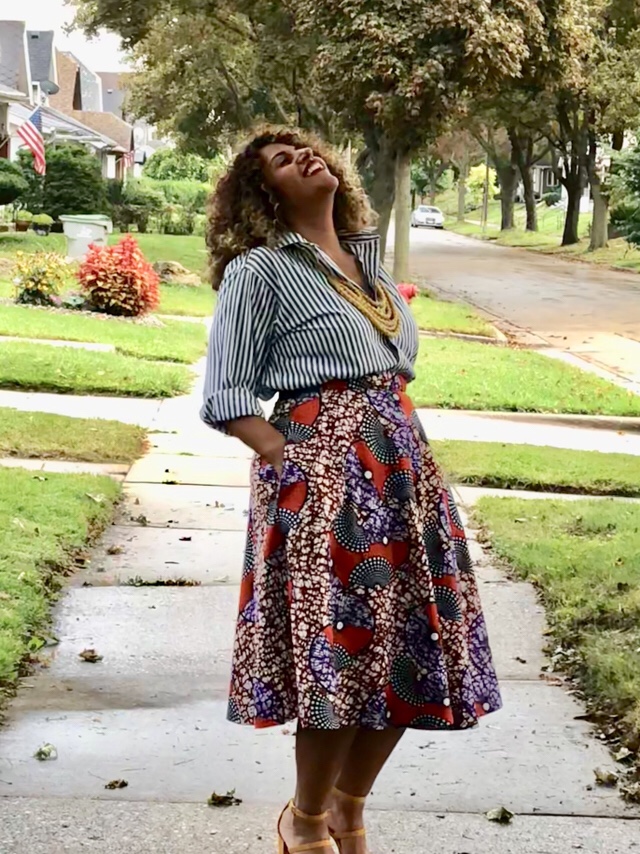
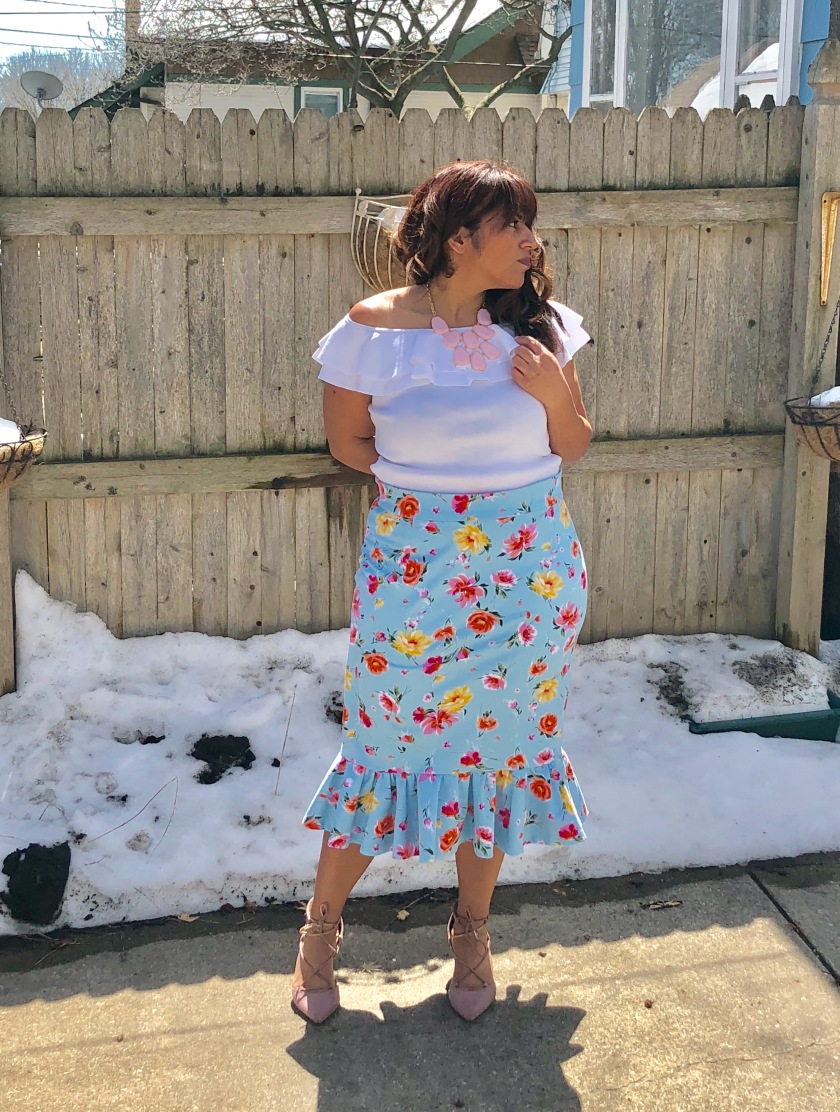
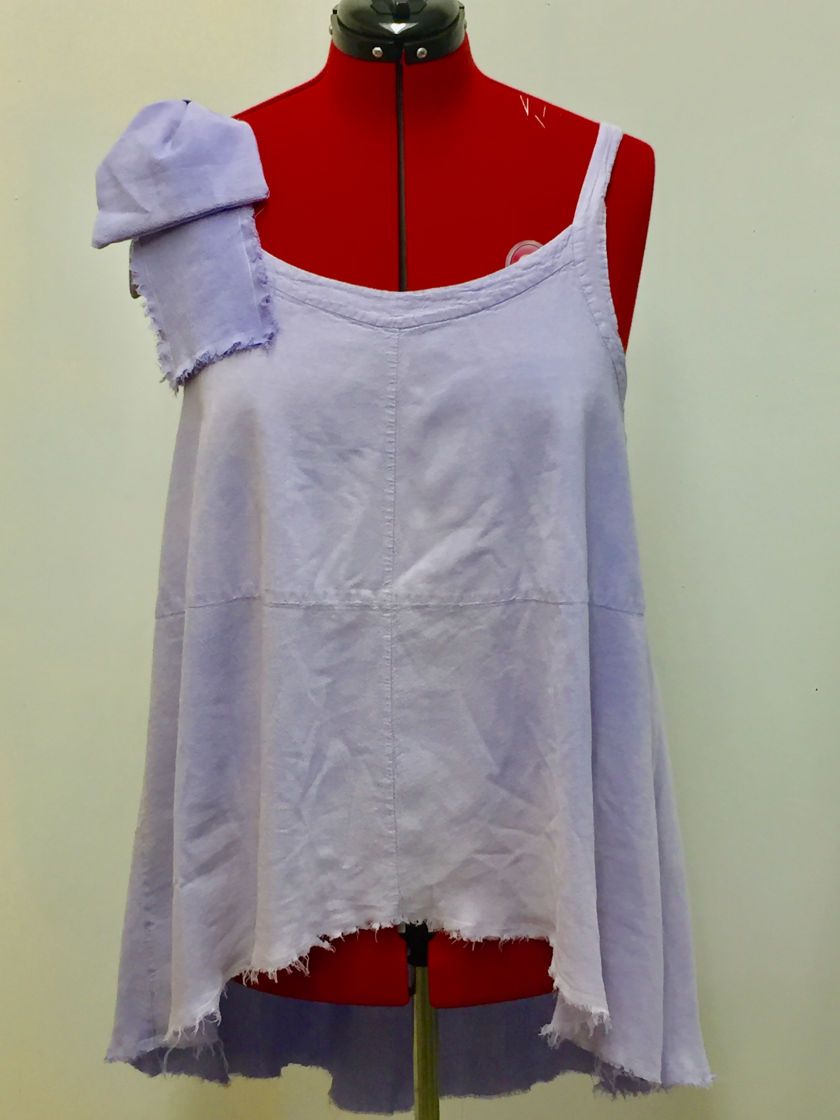
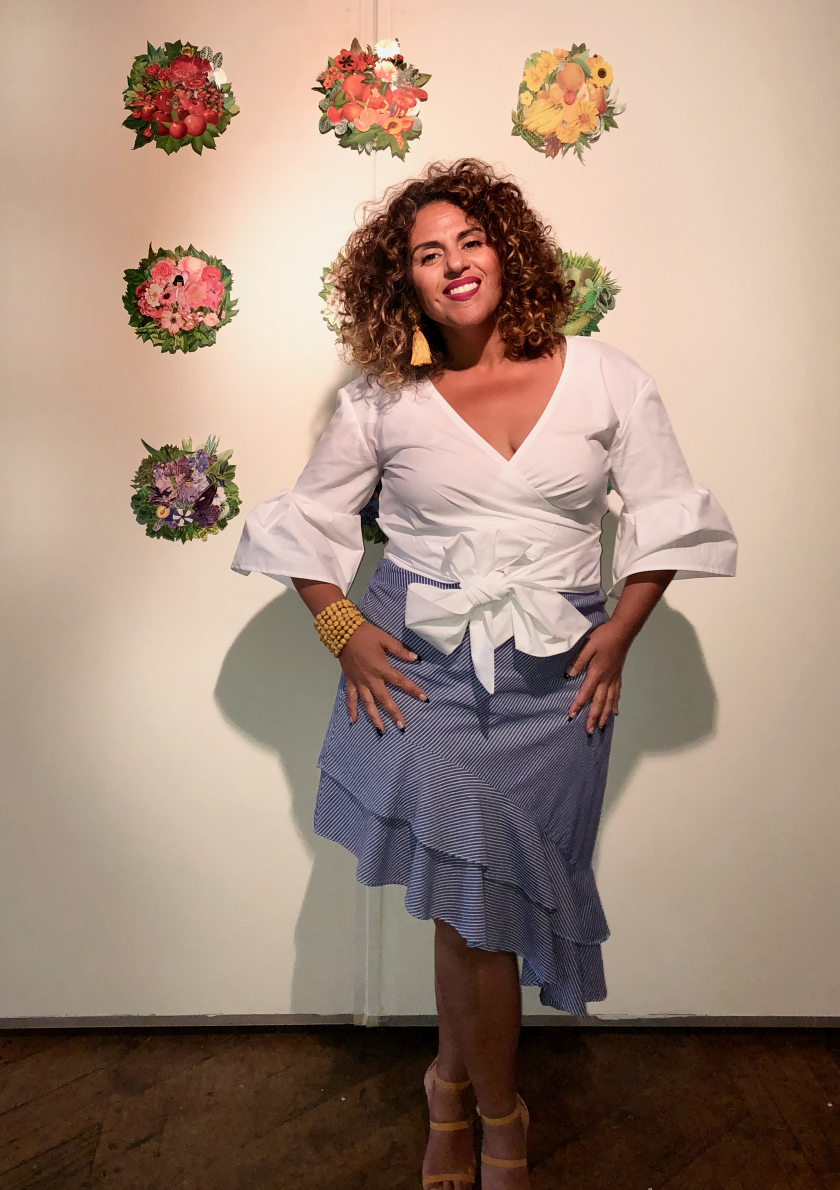
If you know me.  I like to keep things casual.  I’m not huge on evening gowns or overly glamorous oufits.  I do however, love the way designers are bringing sparkle to our everyday lives through sequins.  The incorporation of luxe fabric like velvet and sequins into ready to wear day looks inspired today’s make. Below are a few examples of my inspiration.

I thought it would be fun to make a stretch sequins pencil skirt.  I liked the idea of creating a holiday inspired piece that could stretch into the new year.  This skirt would be lovely and very appropriate at an afterwork holiday party and could be easily worn after the holiday season for a date night with your sweety!

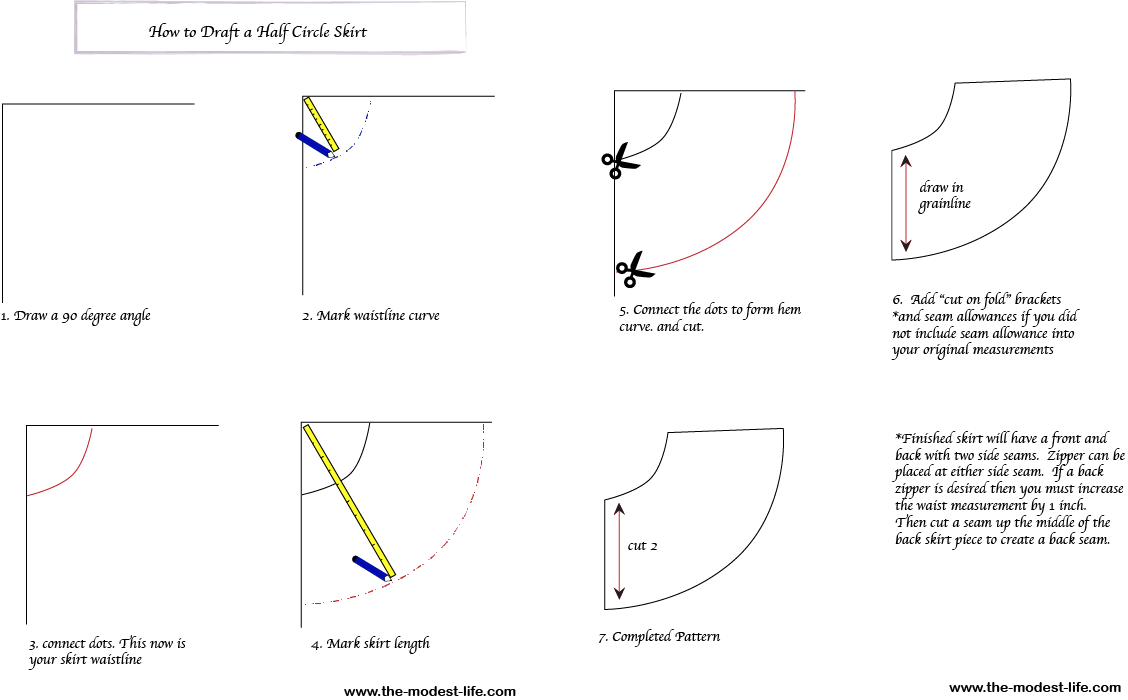
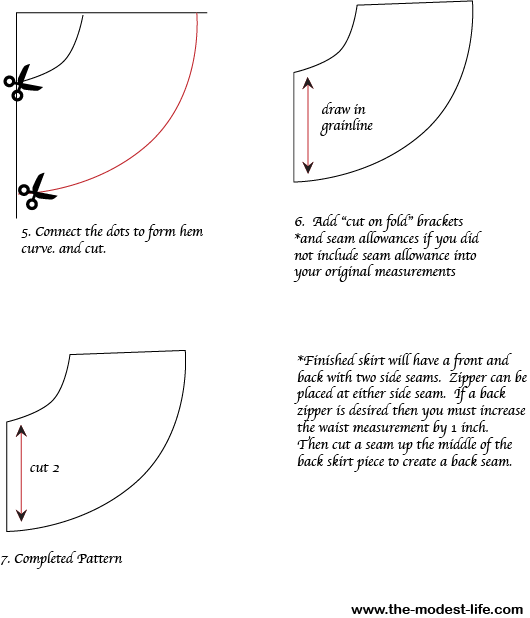
This is a self-drafted pattern that I created using an existing knit pencil skirt. Its high-waisted and has a black elastic waistband.  I also added a lining made from some nude powermesh that I had in my stash for ages.  A little quick tip with the lining.  I like to cut my knit powermesh lining a 1/2 inch smaller than the outer skirt.  It gives a little compression and smooths out your curves nicely.  The sequins I purchased from Joann Fabric.

I chose to keep it sleek with a black blazer, black tank top and suede stilleto boots.  I added a little extra bling with these rhinestone black/gold tassle earrings.  I wanted the sparkle of the beautiful blue sequins to be the star of this outfit.

I also included a few tips that I learned from sewing with sequins below the pictures. I hope you find them helpful.

Tips for Sewing w/ Sequins

  1. Use lots of pins to pin your pattern down.  Those sequins are slippery.  I also used a very sharp rotary blade to cut my pattern instead of scissors. Made it easier to keep the fabric from shifting.
  2. Depending on how bulky your sequins is you may have to remove the sequins from the seam allowance prior to sewing your sequins.  Mine wasn’t so bad and I was able to cut it and sew without removing any of the sequins.
  3. Use a very sharp micro-tex needle.  I used a size 80 microtex needle. This went through my fabric easily without skiping stitches or thread breaking.
  4. Use an all purpose thread in a matching color.  I used a zig zag stitch and followed up with a straight stitch because it was a knit fabric and you could see the thread through the side seams.  Going over the seam a second time with a straight stitch helped tremendously.
  5. Hem your garment by hand.  I top stitched my pencil skirt hem but wish I would have hand finished the hem. It stretched out my hem a little bit.  Not too noticeable.

Well, that’s all for now! Until next time!

xoxo,

♥ Iris

OOTD: Chunky Sweater and Cheetah Print Soft Skirt


“O come, let us sing joyfully to the Lord;
Let us shout joyfully to the rock of our salvation.” Psalm 95:1 (amp)

Hello Everyone!

I pray all is well with you!  Can you believe it…?! Thanksgiving has already passed and we are in full fledged Christmas season.  I am feeling so joyful these days.  I made the decision that I was going to rejoice my way into 2019.  I’m not going to let anything get me down.  Not even the early winter weather we’ve been experiencing here in Wisconsin!  I’ve already pulled out my heavy sweaters and very soon i’ll be wrapping a scarf around my neck.   Good thing for me chunky sweaters are all over the runway this season.

As I was scrolling through pinterest I was very intrigued by how designers are pairing oversized chunky sweaters with lighter weight soft skirts.  Below are a few examples. The look on the left is from Pabal Gurung and the look on the right is from Ulla Johnson.

Ulla Johnson коллекция | Коллекции осень-зима 2017/2018 | Нью-Йорк | VOGUE

It made me want to go through my closet and see if I had anything that I could pull from my existing wardrobe to play to with this look. To my surprise I was able to achieve a similar look with a rayon crepe cheetah print bias cut skirt that I recently bought from the thrift store and my favorite cream colored chunky knit H&M sweater that I had purchased from the Goodwill a few years ago.  In order to keep me from looking overly frumpy I loosely tucked the sweater in at the front and back.  Paired it with my new black suede stilleto boots from Forever 21 to give me height and provide a sleek silohuette.  Paired it with some yellow tassle earrings and voile!  My version of the designer look!


img_0895

img_0884

img_0854

Well that’s all for now!  Until next time.

xoxo,

Iris

Sew the Look: DIY corduroy pencil skirt using Simplicity 8394

“Let us not grow weary or become discouraged in doing good, for at the proper time we will reap, if we do not give in.” Galatians 6:9

Hello Everyone!

Happy Hump Day!  Every now and again I come across a ready to wear garment that I really like and want to add to my wardrobe only to find out that its either out of my price range or not in my size.  When that happens I try and see if its something that I can easily make myself.  So is the case of this cute denim pencil skirt I came across one day while scrolling through pinterest.  I posted the original image below.

Grazen Blue Jeans Asymmetrical Midi Skirt | La Petite Garçonne

I particularly loved the assymetric hemline and raw hem on the peplum.  I’ve been on an unfinished hem kick lately.  I like distressed finishes on a garment but in moderation.  And this skirt offers that balance for me. Below is picture of the inspiration skirt.

What I did

I used simplicity 8394  as the foundation for this skirt.  I’ve used this pattern before and I already knew that I liked the fit so all I had to do was alter the pattern. What was great about using simplicity 8394 is that I only had to alter the hemline of the skirt.  It already had the peplum in the pattern.  If you want to create this look for yourself but don’t own this pattern, I created an illustrated tutorial on how to alter this pattern using a pencil skirt. It includes how to draft the peplum pattern.  I’ll be posting that either tomorrow or Friday.

For my version I chose to use a rust colored stretch corduroy fabric that I purchased from Joann Fabric.  I wanted a heavier weight fabric so that I could wear tights during the colder months.

Style it

Fall weather is so tricky and dressing in layers is definitely the way to go.  So I created a sleek layered look with a black turtleneck, black leatherette jacket, black fishnette tights and my Madden Girl peep toe stilleto booties. The skirt gives the look a nice pop of color  and I added a cheatah print belt to add interest and definition at the waist.

DIY Maxi Skirt using New Look 6213 and Pattern Review

“So I have seen that there is nothing better than that a man should be happy in his own works and activities, for that is his portion (share). For who will bring him [back] to see what will happen after he is gone? “Ecclesiastes 3:22 (amp)

“So I have seen that there is nothing better than that a man should be happy in his own works and activities, for that is his portion (share). For who will bring him [back] to see what will happen after he is gone? “Ecclesiastes 3:22 (amp)

Hello Lovelies!

I pray everyone had a great week! I’m not going to lie. My week felt like such a struggle. Sewing, caring for my family and just general tasks felt like a burden. I found the above scripture during my study time the other day and it reminded me that everything that I’ve been called to do is important. And I should remain thankful instead of complaining. I found myself praying and remembering this scripture every time I started to feel burdened during my day. It helped me to stay focused despite how I felt.  I feel better now too.

How about you…? Do you have a favorite scripture that you remember or pray when your feeling burdened by life? I’d love to hear what it is.

As for this week’s make. I was so delighted to make this week’s skirt for the skirt making series.  If you missed my earlier makes you can check them out here and here .  I also shared a few tutorials that you can check out herehere, and here.

Inspiration

The inspriation for this week came when I stumbled on about 4-5 yards of a very colorful and lovely rayon crepe fabric at the Goodwill.  I only paid $5.00 for it.  I was so excited!  The print and color emits a bit of a boho vibe. Below is a close up of the print. Isn’t it pretty!?

I decided that this fabric would make a very chic fit and flare maxi skirt but had a hard time finding a pattern in the maxi length.  So I ended up lengthening New Look 6203 View J.  The skirt is a bias cut A line skirt.  Which is very figure flattering and reminds of a slip.  This pattern was a very easy make.  It was one pattern piece and the front and back were cut flat on the bias.  Which is gives it its shaping. and allows the skirt to skim over the hips and then flare out into the hem.

What I did

I lenghtened the pattern by about 8 inches to create the length I wanted and had to add about 6 inches at the hip and waist.  The one thing I don’t like about New Look Patterns is that their sizing runs small.  The other change that I made was the way I finished the waistband. The pattern did not call for a separate waistband.  It just folded over the fabric at the waistline and top stitched to form a casing for an elastic to be inserted.

Since the skirt reminds of a slip I decided to finish the waistband like I would a slip.  I found a great slip making tutorial on the craftsy website blog and I found white lingerie elastic at Joann’s.  It was super easy to finish the waistband this way and gave the skirt the desired look I was going for.  My only regret was not finding black lingerie elastic.  Because the elastic is meant to peek out at the top having a matching color makes a difference. Outside of those adjustments I followed the pattern as directed and it was very easy to read and follow.

Style it!

Ironically this look reminds me of a deconstructed kimono.  I didn’t plan it that way.  I actually wanted a look that was chic yet cozy and comfortable to wear. As the weather is shifting to cooler temperatures I have to resist the temptation to put on anything that looks like a wearable blanket. lol!  The obi belt gives me the shaping that I need in my waist area and keeps me from looking frumpy as the skirt and cardigan have very soft silohuettes.

Well that’s all for now…. Until next time!

xoxo!

Iris

DIY distressed denim skirt using simplicity 8019 and tutorial

“I can do all things [which He has called me to do] through Him who strengthens and empowers me [to fulfill His purpose—I am self-sufficient in Christ’s sufficiency; I am ready for anything and equal to anything through Him who infuses me with inner strength and confident peace.]” Philippians 4:13 (amp)

Hello Everyone!

Happy Friyay! Woohoo! we made it through another work week!

I love the skirt that I made this week. I used simplicity 8019 view c it’s a 1970s reproduction. I Love vintage 70s patterns and since 70s fashion is trending for fall I thought it was only appropriate. I had fun making this one. It was a great pattern to work with.

I also love this skirt because it gave me an opportunity to distress the denim using a tutorial from @elicat_diy. I love her work! You should check her out!

I also love textiles and outside of knitting or crochet creating my own textiles is not something I’ve delved into yet.

But when I finished making the skirt I felt like the original dark denim was too simple. Below is a picture of the original color before I distressed it.

I had finished the seams using a flat felled seam in a contrasting gold colored thread thinking that the top stitching would be enough. Yet it felt like it needed a little something else to make it pop! So came the idea and opportunity to play with distressing the denim.

You can click here to see the tutorial that I used. It was great, and had plenty of pictures to help you follow along easily. The only modification that I made was to not tea/coffee stain my skirt after I pulled it out of the bleach solution. I liked the color of my skirt fine and didn’t think it needed it.

In addition to distressing the denim and finishing the seams with a flat felled seam, I added a faux flap welt pocket that I self drafted a pattern for. I also decided to leave the hem raw to compliment the distressed fabric.

I styled the skirt with a casual Friday office theme (hence why your getting a Friday post!) I love jeans and a blazer and used that as inspiration to create this look. The weather is starting to transition into colder fall weather so I wanted to squeeze in one more transitional summer/ fall look before I have to bust out the tights and knee boots to stay warm under my skirts lol!

Well that’s all for now! Until next time! Have a great weekend everyone!

xoxo,

❤️Iris

DIY Skirt Making 101 Series: Fabric Selection (Video)

“Now the Lord is the Spirit, and where the Spirit of the Lord is, there is liberty [emancipation from bondage, true freedom].” 2 Corinthians 3:17

Hello Everyone!

I hope your week is off to an amazing start!  I am so excited as I have been working hard sewing skirts while trying to figure out the world of video tutorials.  I’m not 100% there yet but my daughter and I have been trying to figure out how to edit in imovie and i’m still trying to figure out the overhead tripod situation.  In the meantime I was able to video record this short tutorial about selecting fabric with my iphone tripod.

This week I decided to spend a little time discussing proper fabric selection.  One of the biggest mistakes that many new sewers make is choosing the wrong fabric for their projects.  Skirts are a great beginner sewing project and choosing the right fabric only adds to the success of your finished masterpiece.  In this short tutorial i’ll show a very easy and straight forward way to guide the fabric selection process.

Just click below!  and i’ll see you later this week with my latest make.  Its pure cuteness! and I can’t wait to share it with you all!

♥ xoxo!

Iris


DIY half circle skirt tutorial

Hello Everyone!

I hope your week has been going super! Thanks so much to everyone who liked and commented on Monday’s skirt post. If you missed it you can click here and read all about it.  I really do love the skirt.  So much so that I wanted to put together a quick tutorial on how I made it.

If you are new to circle skirts.  They over all are a quick make and really don’t require a pattern.  You can fold your fabric and draw it on with a tailors chalk or wash away pen, cut and sew.  The biggest thing is finding the radius of your waist measurement.  There is an actual formula that requires simple high school math.

You do this by dividing your waist measurement by pi (or 3.14) and round off your answer to the nearest quarter of an inch.

my waist is 35″ + 1″ for fitting ease= 36″  divided by pi (3.14) = 11.46.  So the radius of my waist measurement is 11.50″

If you opt to use this method.  You can add your seam allowance after you draw out your skirt as I illustrate in the tutorial.  Or you can simply add your seam allowance to your waist measurment.  i.e. waist =35+ 1″ fitting ease+ 1/2″ seam allowance per seam (4 seams) = 38″.

The other and easy way to find your waist radius is to use a circle skirt calculator. My favorite one is from By Hand London.com   I love it because it includes your seam allowance for you (if your making a 2 seam skirt. If you want to add a back seam you have to make sure to increase your waist measurement by your desired seam allowance) as well as gives your length measurement for a mini, midi, or maxi length.  Here’s the link to the app. Its a handy little tool that I use alot.

Once you’ve figured out your radius and desired length you can follow along with the tutorial that I created in Adobe llustrator below.

Supplies: 

  • Fabric of choice 
  • Pattern/butcher paper
  • Measuring tape 
  • push pin or thumb tack 
  • pencil
  • scissors

half circle skirt tutorial 1

  • I forgot to note that the 90 degree angle should be longer than your desired skirt length.


2 circle skirt tutorial 2

Voila! that’s it.  Once this is complete draft a waistband using your waist measurement and desired width and add seam allowance.  Cut and sew.

I hope your inspired to go out and make your own half circle skirt!

Until next time!

xoxo

Iris


DIY Ankara Print Circle Skirt

“They who sow in tears shall reap with joyful singing.” Psalm 126:5 (amplified)

“They who sow in tears shall reap with joyful singing.” Psalm 126:5 (amplified)

Hello Everyone!

I pray your week is off to a great start! I wanted to start this week’s post off with a short testimony about the photoshoot for this weeks make.  These pictures caused me to reflect quite a bit. It started with a conversation that I was having with my daughter after she took my shots. As I was looking at them I had mentioned that they were some great action shots and that my smile looked nice. She said: “yeah mom! Because that’s your actual smile!” Her words blessed my heart and caused me to look more closely at the photos.  She was right. I was genuinely smiling and laughing.

My divorce brought a series of major life changes along with a series of trials that really shook me. I cried out to God so many nights worrying about my and my children’s future.  but I stayed steadfast in God and He used all of it not only to make me stronger; but to give me a testimony about the restorative power of a life in Jesus Christ.  His love has been restoring me from the brokeness and pain of my past.  One of my prayers for 2018 has been for God to restore my joy. When I saw these pictures it became evident that God was answering me. It really blessed me. I wasn’t just posing, but for the first time in a long while, my soul feels light and my smile is reflecting it.  To God be the glory!

As for this weeks DIY post! This skirt is already a favorite of mine. It’s a self drafted half circle skirt and let me first tell you that I messed up my measurements when I cut the fabric lol!. I forgot to add the seam allowance for the back seam. So it was a tight squeeze at the waist lol! But I didn’t want to scrap it and I only needed like another inch. So came the genius idea to add an exposed elastic waistband at the back along with an exposed zipper which I’ve been wanting to play with for a while. I love it !!!! It came out sooo cute and gave the skirt a ready to wear aesthetic that I like. Not to mention that it gave me the waist room I needed. It’s still a bit snug but I’m not struggling to breathe in it lol! I’m calling it my happy accident skirt!

I plan on intentionally remaking this skirt with the right waist ease and a thicker waistband.

Fabric

The fabric is an Ankara print that I bought I believe from House of Mami Wata. I love the print but the print quality and weight of the fabric I was not impressed with. It’s more of a quilters weight cotton and I considered lining it to give it more body but opted to leave it unlined so I could wear it in summer. I chose this print for the skirt because I felt like the colors were a great transitional fall look.

Style it

It took me a little bit to figure out the styling for this because I wanted to do something out of the box but remain true to my style. The top is actually a men’s shirt I bought to use as an up cycling project but liked the idea of print matching with stripes. So I just tucked it in and rolled up the sleeves and voila! The yellow necklace is from Ashley Stewart clearance and the shoes are Forever 21. I think this a great and vibrant transitional season look.


Well thats all for now! until next time!

xoxo,

Iris

DIY Skirt Making 101 w/ free pdf skirt measurement chart

Skirts are probably one of the easiest garments to make and fit as it requires minimal measurements. 

So in Christ Jesus you are all children of God through faith, 27 for all of you who were baptized into Christ have clothed yourselves with Christ.”  Galatians 3:26-27

Hello Everyone!

I pray all is well with you!  I am so behind on posting. Life has been full of soooo many amazing blessings and while I am thankful, those blessings have been keeping me busy.  Like getting my new house ready so my children and I can move in (yaaay!).  Add to that list my daughter fracturing her ankle in a roller skating accident.  Yet in between it all, I have managed to make my first skirt project which I’ll be featuring next week.  Can’t wait to share it with you!!!

For this week however, I wanted to introduce skirt month by spending sometime writing a post that would set the foundation for this series.  Each week in addition to sharing my DIY skirt makes with you I will also share in a seperate post a more in depth explanation of some aspect of skirt making.  For this week I created a free pdf download of a skirt measurment chart.  So here it goes…

DIY Skirt Making 101

Introduction

Skirts are probably one of the easiest garments to make and fit as it requires minimal measurements.  A beginner sewer young or old can make a simple gathered skirt with an elastic waistband in just a few hours.  They are a fun,versatile garment with many styling options making it a great wardrobe staple. Keep reading for for a brief description of skirt construction.

Measurements

Skirt measurements are few.  For a basic straight or pencil skirt, all you need is your natural waist , full hip and length from natural waist to desired length of skirt. If your making a full skirt like a circle or pleated skirt all you need is your waist measurement and desired length. Below is a brief description of how to take your skirt measurments and you can click on this link  Skirt Measurement Chart. to download and print your copy of the skirt measurement chart to use as a tool to record your body measurments.

Natural waist= take a piece of string or yarn and tie it firmly (not tight) around your waist. Bend your torso from left side to right side a few times until the string settles to your natural waistline.  This is the measurement that you want to take.

Natural waist to full hip= This the measurement starts at the natural waist and measures down to the full hip.  For most misses sized women it is about 9inches.  If you are a pear shaped or plus sized this number will most likely be greater.  I am a pear shaped sized 14/16 and my full hip falls about 11inches down from my natural waist.

Full Hip=  The full hip is where the widest part of your hip is on your body.

Length=  This is going to be based on your personal preference and skirt style.  The key here is to measure from your natural waist to your desired finished skirt length. Below is an image that I found on Pinterest of the various skirt lengths and their names.

skirt lengths

Basic components of a skirt

Like I mentioned earlier, skirt designs vary but all skirts have a waistband or facing, the body of the skirt, a hemline and elastic or a closure like a zipper, snaps, buttons etc.

Supplies needed

  1. Measuring Tape
  2. Fabric of Choice
  3. Interfacing or elastic (if making an elastic waistband)
  4. Sewing thread
  5. Closure of choice (zippers, buttons, snaps are the most commonly used)
  6. Sewing machine
  7. hemming tape or wash away tape (not necessary but can be useful with hemming).

Skirt Styles

Once you understand how a basic skirt is constructed the possibilities are endless.  Below is a chart that I found on pinterest that illustrates some common skirt styles.  This skirt series will focus heavily on skirt construction and not design.  However, I hope to feature a few projects toward the end of the month that demonstrate some basic skirt design options.

4e2feb9ea69fafaea22b0589bc430dde

Fabric options:

There are a variety of fabrics that make a great skirt.  It really depends on the skirt style and look that you are going for. The easiest way to begin to familiarize beginner sewers with fabric is to purchase commercial patterns. All patterns list the recommended fabric on the back of the pattern envelope. I think this is a great place for beginner sewers to start.  Below I have listed a few of my favorite skirt fabrics.

  • Mid-weight cotton
  • denim
  • stretch sateen
  • light to mid weight twill
  • wool 
  • rayon
  • ponte knit

Closures:

A basic skirt with a waistband uses a zipper.  Some skirt styles like a jean pencil skirt for example may have a button placket going up the front of the skirt.  This is an example of using a closure for both aesthetic and construction purposes.  The exception is usually a skirt that has an elastic waistband or a skirt made from a knit fabric as the elasticity of the waistband and the fabric allow the fabric to easily come on and off the body.

Well there you have it.   A basic introduction to skirt construction.  Pretty straight forward right? Make sure to stay plugged in for the rest of the series.  Each week i’ll be posting all of my DIY skirt makes and will go more in depth about each aspect of skirt making!

Have a great week everyone! Until next time!

♥ xoxo

Iris

DIY Summer/Spring Round Up

“But let all who take refuge and put their trust in You rejoice, Let them ever sing for joy; Because You cover and shelter them, Let those who love Your name be joyful and exult in You.”  Psalm 5:11

Hello Everyone!

I hope your week is going well! I’m a little behind on my post this week. I closed on my house last week Friday yaaay! And my children returned from their summer away with dad and I’ve been working on getting them ready for their first day of school. So It’s been a little hectic!

This week marks a benchmark for the blog. We made it through our first season! One of my blogging goals when I started The Modest Life was to have a place where I could develop and document my creative process.

So to have made it through our first season is a huge celebration for me. I’ve learned so much about blogging, but also about things like my personal style and photography. It has also challenged me to remain consistent and confident in what I create and share with you all!

So this week I thought it would be only fitting to post a round up of all of my spring/summer makes! I love them all but I definitely have a few favorites.  If you missed the original posts with the details of each make.  No worries!  I made sure to link to the orginal posts under each photo.  I’d love to hear in the comments which was your favorite look!

DIY Peplum Hem Skirt

DIY Top and Pants   

IMG_8444

DIY Evening Look

Upcycled Skirt Set with tutorial

Upcycled hi-lo top from a dress w/ tutorial

Sunday Wrap Dress

Denim Tent Dress

DIY Summer Dress

DIY Wrap Top

I also wanted to thank all of you for supporting The Modest Life. Your comments and likes of each post keep me encouraged to keeping going. I’m working on fall/winter and I can’t wait to bring you all what I hope to be really great content!

That’s it for now! Until next time!

❤️ xoxo,

Iris