Sew Easy Summer Pattern Round Up

“In your relationships with one another, have the same mindset as Christ Jesus:” Philippians 2:5

Hey Everyone!

How are you?  Any special 4th of July plans?  I wish I was one of those people that gets into holiday sewing.  I always admire folks who take the time to make a red,white and blue kind of sewing project.  Or costume sew for Halloween. or make matching christmas pajamas for their kids.  Thats just not my thing. lol!

I am looking forward to the 4th of July holiday though.  My kids are away with their dad but my brother and his family are flying in from Arizona.  I am really looking forward to spending sometime with my nieces and nephews.

This week’s post is a Sew Easy Summer Sewing Pattern Round UP.  Like I mentioned when I announced this series I was looking to sew projects that had minimal pattern pieces (5 or less), no zipper or button closures.  Pretty much anything that I can pull up or pull over my head.  I also thought some of you might be feeling kind of craft lazy this summer also and would like to keep sewing projects laid back and easy.  Below is a list of what I pulled from the latest spring/summer collections from the Big 3 as well as a few indy patterns companies.

The Patterns

The Big 3 Companies

Vogue

V9374 Pull on Pants

V9375 MISSES’ VEST, JACKET AND PANTS

V9377  Misses Jacket and Belt

Butterick

B6691 Misses Jacket and Jumpsuit

B6680 Misses Dress

B6685 Misses Top and Sash

McCalls

M7942  Misses’, Children’s and Girls’ Top, Skirt, Shorts and Pants

Indy Pattern Companies

For this list I just linked you to a handful of company websites because many of them only have a handful of patterns on their site.  Many of which are stylish, very easy and beginner friendly.  Its worth the extra effort to spend time on their sites.  They often have really great blogs and tutorials in addition to their shop.

Paper Theory Patterns

Style Sew Me

Closet Case Patterns

Megan Nielsen Patterns

Friday Pattern Company

MimiG Style

Rosy Peña Patterns

That’s it!  A nice round up of some great and easy sewing patterns to help you build your handmade summer wardrobe without too much fuss.  Have a great 4th of July holiday everyone! Catch you next week…

blog signature


DIY Tunic Top using Simplicity 8094


But as for me, I trust [confidently] in You and Your greatness, O Lord; I said, “You are my God.” Psalm 31:14

Hey Everyone!

I’ve been appreciating all of the love with the Thrift The Look series that launched on Monday.  Today’s post is a continuation of the Summer Sew Easy Series.  We are on Look #3 already and I can’t tell you how much I love this tunic.

I used Simplicity 8094. I bought this pattern last spring and I think it is out of print now.  I’ve found it on Ebay and Etsy though.  I love it for many reasons.  There are so many style variations that you can try with this pattern.  The first time I made it in a tribal print medium weight knit fabric and I made view E.

This time around I made the sleeveless option view D using a red light weight cotton from my stash.  I love the dramatic side slits that start at the waistline.  It gives a modestly sexy side profile ( can you use modest and sexy in the same sentence..?).  But if you don’t like showing that much silohuette you can always wear a tank top underneath, wear high waist pants, or just sew the slit a little lower.  Overall its a great casual everday look or you could dress it up by wearing faux leather leggings or a pencil skirt underneath.  Even wearing a pair of stilettos with your skinny jeans would amplify the look.

The pattern was easy to cut and sew.  I plan on making a few more of these.  I could see it in a nice printed rayon or linen would be beautiful as well. If you use cotton I recommend one that has a nice drape to it.  Nothing too stiff.

I styled it very casual with a pair of dark wash skinny jeans from NY and Company purchased like 2 years ago.  And my favorite cognac and snake print wedges that I purchased on clearance from DSW last summer.

Photo credits: my beautiful daughter Asabea.


Well that’s all for now. Until next time…..

blog signature


DIY Linen Pants Using Simplicity 8389

“For everything there is a season, and a time for every purpose under heaven:” Ecclesiastes 3:1

Hello Lovelies!

I hope your week is going splendidly.  I’ve been breezing through my Sew Easy Sewing Makes for the summer series.  Its been such a breath of fresh air for me.  Not just because I’ve been flying through my projects list.  But also because its been really liberating my thought process around my personal style choices.

For a long time now i’ve been struggling between creating things that I deem wow and blog worthy vs. what is truly my personal style aesthetic.  Working through my fabric and pattern stash has given me a framework to focus my individual projects while forcing me to take an internal inventory.  And i’m realizing the following:

  1. Buying fabric is like clothes shopping.  You can sometimes purchase things that are a hit and sometimes its a miss.
  2. I have alot of  summer weight woven fabric in bright colors mostly from natural fibers like cotton.  (A lot of cotton.)
  3. I’m not challenging myself to my full potential.  I keep buying the same kind of fabric and choose the same kind of projects. Pants are a prime example.  I hate working through pants fitting issues.  So I tend to stick to making dresses or skirts.
  4. I want to make things that are really pieces that I can incorporate into my everyday life.  Whether they are wow to others or not.

Which leads me to today’s DIY project.  I bought Simplicity 8389 last summer because they seemed like an easy pull on pants pattern.  It has been lurking in my sewing room for a while and everytime I passed it, I would pick it up and look it over.  So finally about 3 weeks ago I decided to bite the bullet and try my hand at pants fitting again.

Fitting palazzo pants is much easier that fitting fitted pants.  I created one muslin before going into fashion fabric.  What I learned from the first fitting is that I didn’t like the rise of the pants.  On the model in the pattern envelope picture it looks like the pants are high waist.  But in reality they fit more like a mid-rise.  Below is a picture of me in the muslin. IMG_3045

On my curvy pear shape.  This isn’t a flattering cut for me in a palazzo pant.  So I made a few modifications which  I list below:

Modifications:

  • Raised the waistline 2 inches only at the side seams and back rise.  This made the pants high waist which is more flattering for my shape but it also added length to the back rise.  (I didn’t need to add to the front because it would have lengthened too much in the front.)
  •  Lengthened back crotch curve by 1in.  There was bunching at the bottom of my butt where the fabric curves into the crotch.  Which was an indicator that I needed to lengthen the crotch curve at the back.
  • The waistband was a bit of a challenge. For the following reasons:  a. The pattern itself was off by about 1.5 inches too short.  So I had to redraft the pattern to make sure it fit. And b. the back band did not stop at the side seams like in a traditional pant. It instead reach around to the front band at the princess lines.  Once I put the elastic in it caused a weird gathering and unflattering fit at the side seams. It gave me a bit of a muffin top.
  • I widened the waistband  from a 1.5″ wide band to be a finished width of 3″.  I also re-drafted the front and back bands to sew together at the side seams. This gave me a more flattering fit at the waist.
  • I took in 1 inch at both inseam and outer seam starting at the hip.  There was too much fabric in the leg.
  • The last thing I did was more out of trying to save my final project because the modifications created a great waistline, and fit in the seat. However, there was way to much room in the front rise.  So I opted instead to release the front pleats and convert the entire waistband to an elastic waistband instead of how the pattern was originally drafted and removed about 7 inches of ease from the front waistline.

My final is more of a wearable muslin.  Even with the emergency modifications there is about an 1.5″ of ease from the front crotch that needs to be removed.  However.  I really like the way they came out and wore them to church styled in the way they are featured below.  These pants have some great styling possibilities and i’ll be posting those as #OOTD on my Instagram page throughout the week. So stay connected.

Photo credits: My beautiful daughter Asabea..

Well that’s all for now! Until next time….

blog signature


Pattern Hack Tutorial: Asymmetric Pencil Skirt

For today’s post I created a step by step illustrated tutorial for how to draft a pattern for your very own version of this project.

But as for me, I trust [confidently] in You and Your greatness, O Lord;
I said, “You are my God.” Psalm 31:14 (amp)

Hello Everyone!

Thank you so much for all the love and comments that I received for my Sew the Look: Asymmetric Pencil Skirt.  If you missed it you can catch up here.  Pattern Hacking is a new term for me but as I began delving into the world of sewing blogs I realized that it is a term used to describe how to alter a pattern in order to create another design. Actually in fashion school that is all we learned how to do.  You start with what’s called a sloper or block and you manipulate the pattern into the design that your creating.

For this particular project, I used Simplicity 8394  because it was very similar to the skirt that I wanted to make and I knew I could make it with very few pattern adjustments.  However, the great thing about this skirt project is that you can make it using a well fitting pencil skirt pattern as well.

For today’s post I created a step by step illustrated tutorial for how to draft a pattern for your very own version of this project. You can use simplicity 8394 if you like, but for this tutorial I show you how to make the pattern using a pencil skirt. Below is an image of what the illustrated tutorial looks like. You can also download the pdf copy of the  asymmetric skirt pattern hack tutorial here.

assymetric pattern hack tutorial

Please note that this is a patterning tutorial and not a sewing tutorial. It assumes that you have previous sewing knowledge and that you are familiar with using sewing patterns.

Well thats all for now!  Until next time….

xoxo!

Iris

Sew the Look: DIY corduroy pencil skirt using Simplicity 8394

“Let us not grow weary or become discouraged in doing good, for at the proper time we will reap, if we do not give in.” Galatians 6:9

Hello Everyone!

Happy Hump Day!  Every now and again I come across a ready to wear garment that I really like and want to add to my wardrobe only to find out that its either out of my price range or not in my size.  When that happens I try and see if its something that I can easily make myself.  So is the case of this cute denim pencil skirt I came across one day while scrolling through pinterest.  I posted the original image below.

Grazen Blue Jeans Asymmetrical Midi Skirt | La Petite Garçonne

I particularly loved the assymetric hemline and raw hem on the peplum.  I’ve been on an unfinished hem kick lately.  I like distressed finishes on a garment but in moderation.  And this skirt offers that balance for me. Below is picture of the inspiration skirt.

What I did

I used simplicity 8394  as the foundation for this skirt.  I’ve used this pattern before and I already knew that I liked the fit so all I had to do was alter the pattern. What was great about using simplicity 8394 is that I only had to alter the hemline of the skirt.  It already had the peplum in the pattern.  If you want to create this look for yourself but don’t own this pattern, I created an illustrated tutorial on how to alter this pattern using a pencil skirt. It includes how to draft the peplum pattern.  I’ll be posting that either tomorrow or Friday.

For my version I chose to use a rust colored stretch corduroy fabric that I purchased from Joann Fabric.  I wanted a heavier weight fabric so that I could wear tights during the colder months.

Style it

Fall weather is so tricky and dressing in layers is definitely the way to go.  So I created a sleek layered look with a black turtleneck, black leatherette jacket, black fishnette tights and my Madden Girl peep toe stilleto booties. The skirt gives the look a nice pop of color  and I added a cheatah print belt to add interest and definition at the waist.

DIY distressed denim skirt using simplicity 8019 and tutorial

“I can do all things [which He has called me to do] through Him who strengthens and empowers me [to fulfill His purpose—I am self-sufficient in Christ’s sufficiency; I am ready for anything and equal to anything through Him who infuses me with inner strength and confident peace.]” Philippians 4:13 (amp)

Hello Everyone!

Happy Friyay! Woohoo! we made it through another work week!

I love the skirt that I made this week. I used simplicity 8019 view c it’s a 1970s reproduction. I Love vintage 70s patterns and since 70s fashion is trending for fall I thought it was only appropriate. I had fun making this one. It was a great pattern to work with.

I also love this skirt because it gave me an opportunity to distress the denim using a tutorial from @elicat_diy. I love her work! You should check her out!

I also love textiles and outside of knitting or crochet creating my own textiles is not something I’ve delved into yet.

But when I finished making the skirt I felt like the original dark denim was too simple. Below is a picture of the original color before I distressed it.

I had finished the seams using a flat felled seam in a contrasting gold colored thread thinking that the top stitching would be enough. Yet it felt like it needed a little something else to make it pop! So came the idea and opportunity to play with distressing the denim.

You can click here to see the tutorial that I used. It was great, and had plenty of pictures to help you follow along easily. The only modification that I made was to not tea/coffee stain my skirt after I pulled it out of the bleach solution. I liked the color of my skirt fine and didn’t think it needed it.

In addition to distressing the denim and finishing the seams with a flat felled seam, I added a faux flap welt pocket that I self drafted a pattern for. I also decided to leave the hem raw to compliment the distressed fabric.

I styled the skirt with a casual Friday office theme (hence why your getting a Friday post!) I love jeans and a blazer and used that as inspiration to create this look. The weather is starting to transition into colder fall weather so I wanted to squeeze in one more transitional summer/ fall look before I have to bust out the tights and knee boots to stay warm under my skirts lol!

Well that’s all for now! Until next time! Have a great weekend everyone!

xoxo,

❤️Iris

The FIRE Awards and DIY Evening Look and Pattern Hack using Vogue 9253 and Simplicity 8655

“Then Pharaoh took off his signet ring from his hand and put it on Joseph’s hand, and dressed him in [official] vestments of fine linen and put a gold chain around his neck.” Genesis 41:42

“Then Pharaoh took off his signet ring from his hand and put it on Joseph’s hand, and dressed him in [official] vestments of fine linen and put a gold chain around his neck.” Genesis 41:42

Hey Ya’ll!

I pray all is well with you!  I had an amazing weekend that included sewing and spending time with my family,friends and going to church.  It was like my favorite hit list of things to do wrapped up in a few days!

I had a great time doing it all but I really wanted to spend sometime talking about this event that I went to Sunday evening called the FIRE Awards (Females in Recognition of Excellence).  A friend of mine was being recognized and I decided to go because I wanted to support her but I also liked that you could dress up and was like….. “who doesn’t like to do that.” So I made the DIY statement top and pants that I’ll talk about in a bit.

Back to the FIRE Awards….IMG_8488

I had never heard of it until this year but apparently its in its 3rd year.  It recognizes women and girls who are making a difference in the Milwaukee community.  While I went for my friend, there were a few awesome women that i’ve known for many years who were being recognized as well. Below are a few shots with just two of the women that I knew.  But there were a few others that I knew as well.

IMG_8432

IMG_8453

There were various categories of recognition that included entrepreneurship, community involvement, perseverance, sistahood, image and art and one award called the Josie Mae Thomas Award.  Each of the women recognized had an amazing story and journey that led them to the work that they are doing here in Milwaukee.  Which was so inspiring.  And each of them when they accepted their awards offered a word of encouragement and some even shed tears when they shared their testimonies with the audience.

What impressed me so much about this event was its sincerity.  It was clear to me that this event was birthed from someone’s heart and sincere desire to uplift girls and women.  I was also impressed with the fact that their sponsors were small local businesses and individuals who contributed to make sure the event costs were covered.  The venue and decorations were beautiful along with all the guests.  Everyone was dressed very well, with some wearing evening gowns and others wore dress casual.  I chose to live somewhere in the middle.  I am really not the evening gown kind of girl.  However, I do love what I call “red carpet casual”.

Which leads me to the pattern review and design details of this post.

IMG_8439

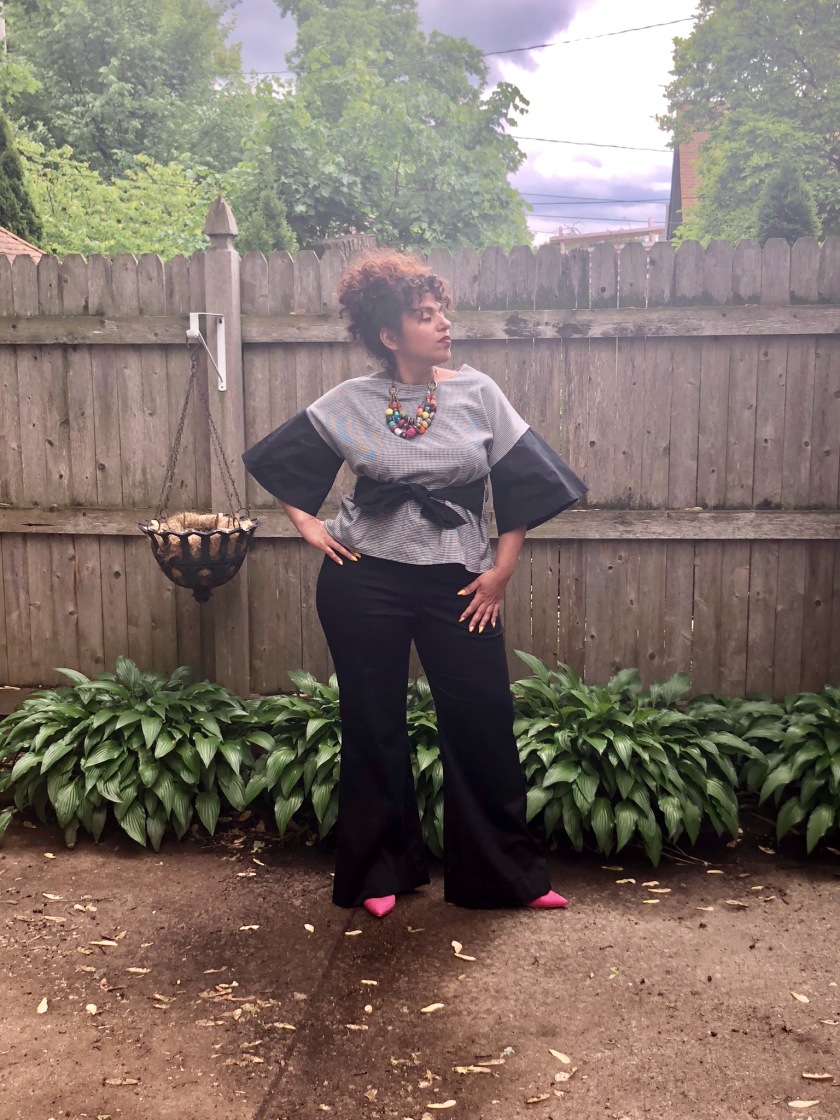
The entire look was 30’s and 40’s inspired with a modern twist.  It featured dropped shoulders and a  peplum with a plunge neckline and midriff that I used Vogue 9253  to create the upper bodice and the midriff and peplum were self-drafted. While I love the idea of a plunging neckline the original pattern’s version was a little too plunging for me.  Which led me to make the decision to remove about 2.5 inches from the hem of the bodice and create a 3 inch wide midriff instead.  This way I could still enjoy the plunge style without feeling too naked lol! I also needed to add an invisible zipper all the way down the back bodice, through the midriff and a few inches down into the peplum in order to be able comfortably get in and out of the top.

The peplum was a bit of a pain as I was playing with the shaping of the peplum.  I didn’t want it to be a traditional peplum I wanted it to wrap in the front to create a little bit of drama but still be figure flattering and not look too big.  So I spent a little bit of time draping it on my dress form until I got the shaping the way I wanted it.

The pants I’ve made before is Simplicity 8655  view C a mimi g style pattern.  I just tapered the leg at the knee on this one and reduced the flare at the hem to a slim bootleg cut and added a 1.5 inch self- drafted contour waistband instead of the facing.  Overall, I like the fit of these pants but I could have left a bit more ease in the knee and calf.  I am still working out how much ease to leave in a garment because I hate baggy clothes that lose their shape once you wear them so I tend to take it in a little too much.

The fabric was left over from my Junior Collection that I designed last spring for the annual student fashion show when I was in design school.  The Top is a metallic gold, brocade with charcoal grey, black and mauve pink accents that I sourced from Moodfabrics.com. Its lined with a black matte satin that I recently purchased from Joann Fabrics and the pants were made from a stretch wool suiting that I also sourced from Moodfabrics.com last spring for the show.

IMG_8446

I also have to give a shoutout to my hairdresser for this hairdo I’m wearing. You can find her on instagram @Liz_mke.  She’s pretty dope with the braids but she does it all.  Color, cuts, styling she great at as well.  If your in Milwaukee you should check her out.  Make-up was me and the shoes i’ve had for about 3 years now but seem to have an inifinite life cycle as they go with so many things in my summer wardrobe.

IMG_8444

And the final blessing of this evening is that I designed this look under my clothing label Virtuous By Design.  Its been awhile since i’ve created anything under this lable.  So it felt extra special.

IMG_8455

Well until the next time!

xoxo,

Iris

5 lessons for pants fitting

“She speaks with wisdom and faithful instruction is on her tongue.”

Proverbs 31:26 (NIV)

“She speaks with wisdom and faithful instruction is on her tongue.”

Proverbs 31:26 (NIV)

Hey ya’ll!  I pray that you all are having a great day!  Thanks for all the love from my Sunday DIY pants and top post.  Its always encouraging to see that people are taking the time to read my posts and I hope are being blessed by the content.  If you didn’t read it you can click here and take a peak.

Like I mentioned on Sunday’s post, pants fitting has always been a challenge for me and i’ve made a decision to really work on.  I pretty much devoted all of May to this and while I learned alot, there is always more to learn and in sewing you have to practice.  So I plan on making pants an ongoing goal in between my other makes.  Practice makes perfect!

For today however, I decided to share my top 5 lessons learned from my May pants making experience

1.Start with a pant design that you really like.  This will help you to focus on fitting the pants as well as give you a better idea of how a pant should fit.  For example I wanted a very fitted cigarette style pant and I used simplicity 8056 pattern because I also wanted a similar style with a flare leg as well. I thought I could get a two for one out of this pattern.  Only to realize after that this pattern is more for a bootleg trouser which have a looser fit in the seat and leg. Trying to get these to where I wanted them was a bit of a mess.  However, this pattern allowed me to figure out crotch and rise fitting.  As I always need more room in my seat and less room in the front crotch.

2.Don’t be afraid to use measurements from a pair of well fitting pants in your existing wardrobe.  This helped me tremendously in crotch and rise fitting.  I had a couple of skinny jeans that I love the fit of and measured the front and back rise as well as inseam length and waist to knee length to help me troubleshoot the best measurements to use for fitting my pattern.  Just make sure the pants are similar to the style, fit and fabric your looking for.

3.Invest in a good fitting book that extensively details fit issues and corrections.  While I found some great tutorials on pinterest and You Tube I still found it hard to find everything that I needed.  I had to pull from a couple of different places including my design book from school.  Pants Fitting For Real People, was one that was recommended by several sewing bloggers so I bought it. However, I found it hard to navigate and in the end I just gave up on the book.  Which is actually a critique that I heard from only one other blogger.

4.Use a pattern that is easy to fit with minimal pattern pieces, especially if this is your first time fitting pants.  My second attempt at a muslin I decided to use simplicity 8514 which was more in line with my desired style.  However, it was designed with princess seams which is suppose to make fitting easier but for me made it confusing.  It was also hard to slash and spread on pattern corrections.

The good thing about this pattern is that the fitted silouhette allowed me to see that          the pants leg needed to be shortened at the knee.  I was having alot of wrinkling at            the knee and I also noticed it in my first muslin.  So I measured and found that the            knee on most commercial patterns are about 1-2″ too long for my short curvy legs.            Causing an ugly pooling of wrinkles at the knee. (no bueno!)

5.When you get a great fitting pants pattern keep it and begin to explore the              different design variations that you can create using the same pattern as your          foundation.  Adding a fly front, waistband, belt loops or welt pockets etc.  This way          you can challenge yourself to learn new techniques without fussing with fit.  Or                maybe you can change the pant leg or explore different color and fabric options to            add variety to your wardrobe.

My 3rd and most successful muslin was using a new mimi g pattern simplicity 8655          This by far has been my favorite fit and is exactly what I wanted in a pants style. It            came together quickly and armed with all of my new fitting lessons and                                techniques I was able to cut, alter and sew a muslin in a few hours.  Now that I                    have a pair of well fitting pants, I’ve decided that I want to use this mimi g pattern              to design a pair of high waist flare leg jeans by adding a fly front, pockets,                              waistband and butt pockets.

Well that’s all for now!  I hope this post was helpful.  I plan on working on one more post this week on how to make a front crotch and back rise adjustment. So stay tuned!

xoxo,

Iris


Pattern Review: DIY Pants and Top Simplicity 8655 & New Look 6519

“That my heart may sing your praises and not be silent.
    Lord my God, I will praise you forever.” Psalm 31:12

Hey y’all! it’s been a minute since i’ve posted here but I’ve been crazy busy with moving the business into our new studio space. woohoo! right…!

After 2 years of working at school and home I am finally at a point where I can afford dedicated sewing and creative space.  I’m also in the process of buying a house!  I’m super excited for this new season in my life!

In between it all I have been working on pants fitting.  Even in design school this was a challenge for me. But I decided that I was going to use the blog as a platfrom to tackle all the hard stuff and share my journey and lessons learned with my readers. This post is more a pattern review but I plan on posting later this week some of my top lessons learned.

On to the Pattern Review.  Beginning with the pants.  I used simplicity 8655 new Mimi G Style pattern.  I chose these pants because they seemed easy enough and I really liked the high waist and leg options.  I made the flare leg option first and I really liked the pattern.  It was easy to make all of the pattern adjustments and it sewed together quickly.  These are basically my final muslin.  I used a bottom weight stretch sateen from Joann fabric.  I had to add 2inches to the back rise and take about 2.5 inches off of the front crotch. I also had to shorten at the knee by about an 1in.  The one thing I will say about this pattern is that I don’t like the facing at the waistband.  I plan on making these again in a better quality fabric and just add a 1″ waistband.  Overall I like the fit especially in the butt and hip area but next time I think I will take in a little bit at the leg and knee and I may also reduce the flare at the hem to fit more like a bootleg.

The top is  New Look 6519. I really liked this pattern it came together quickly and I went straight into fashion fabric.  The only thing I changed was to create the bell sleeve that I attached to the hem of the drop shoulder for a little bit of drama and contrast.  The fabric I purchased at Joann Fabric. Its a houndstooth stretch suiting.  Its very soft and has a nice weight and drape to it. The bell sleeve is made from a black stretch sateen.

I wore this outfit to church today and felt very feminine and chic!! uuuuwww Lala!  lol!  I paired the black and white with pops of color with the pink in my shoes and my necklace.

EABC8F02-3593-4C93-AD19-DBD97BED0E61


9EEDA49C-056D-42AB-9CC6-699EB05690D6


959171BD-5359-40FF-A045-60A5B29FAEB1EA633CFB-E0D1-4AB0-83A9-3746C9E7A8E59926367C-9B3F-4B8B-AF7C-AAF713DA1838961FE560-8CFD-41A1-93B3-3BBBC24288B6

Well thats it for now!

As always I hope this post was a blessing to you. Until next time!

xoxo

Iris


Dreaming of Spring & DIY Peplum Hem Pencil Skirt Simplicity 8394

You, O Lord, are a shield for me, My glory [and my honor], and the One who lifts my head.  Psalm 3:3 (amplified)

Hey Y’all!  Happy Friday! I finally caught a break on the weather.  After the 2 snow storms earlier this week the past two days of sunshine and 50+ degree weather has been glorious! Further to my delight was my daughter having the day off from school.  Good weather + photographer = photoshoot.  Which I have been trying to have since just before Easter.

I originally sewed this skirt using Simplicity 8394 a Mimigstyle pattern for Easter.  My daughter and I worked on making ourselves mom and me skirts for church and I bought my son a suit in a complimentary color.  However, that was a total bust because he got sick with strep throat and we were on lock down the whole Easter weekend.  bummer right..? So I decided that we would give it another try for Mother’s Day.  (I’m planning a future blog post for that as well featuring my daughter’s skirts that she made using Simplicity 8609).

We used this vintage inspired scattered floral print stretch twill fabric from Joann Fabrics.  I let her choose the fabric and at first I wasn’t feeling it until I saw this pattern.  The 1950’s vibe of the skirt along with the fitted silouhette of the pencil skirt worked well with the vintage vibe of the fabric without making it look old fashioned.  The top I bought from NY and Co and the shoes are from my closet.

Overall. I  this pattern!!! Fitting it was easy. I added a contoured waistband instead of using the facing and I finished the flounce by adding a lining.  I hate double fold hems. Its one of my least favorite finishing techniques.  So I attached the lining to the flounce at the hem and folded it up/ understitched and attached it to the hem of the pencil skirt.  I like the clean finish of the hem and it gave a little weight and extra fullness to the flounce.

The only thing that I didn’t like about this pattern was that the sizing ran small. I had to add 6.5″ to the hip and 3.5″ to the waist.  It came in plus sizing as well, which would have given me the room I needed in the hip but would have been huge on me everywhere else.  I opted instead for the smaller misses sizing and increased only where I needed to,  which worked out perfectly.  Other than that I noticed after I finished it that the side seam needs to be moved foward by about 1/2 “.  I’ll do it next time by adding 1/2″ to the side seam back and subtracting 1/2” to the side seam of the front.  I plan on making this a go to pencil skirt sloper for future skirt projects.  It’s figure flattering without being tight which for me is always a good thing!

IMG_1394

IMG_1391

IMG_1370

IMG_1389

Until next time!!

XOXO,

Iris