DIY Summer Dress Using Tabitha Sewer’s LenaHorne Dress Pattern

This week’s post is my version of the #lenahornedress from Tabitha Sewer

“So now, do not be afraid; I will provide for you and support you and your little ones.” So he comforted them [giving them encouragement and hope] and spoke [with kindness] to their hearts.” Genesis 50:21(amp)

Hey Y’all!

How’s it going? I’ve been suuuper chill these days! After a busy June and July, I finally have some down time. I’ve been casually taking care of some house work, engaging in some sewing, hanging out with friends, about to start a little fall planning. But I really feel like I’m in a season of relaxation. So I’ve been doing these things at a chill pace. How about you all….? How has your summer been?

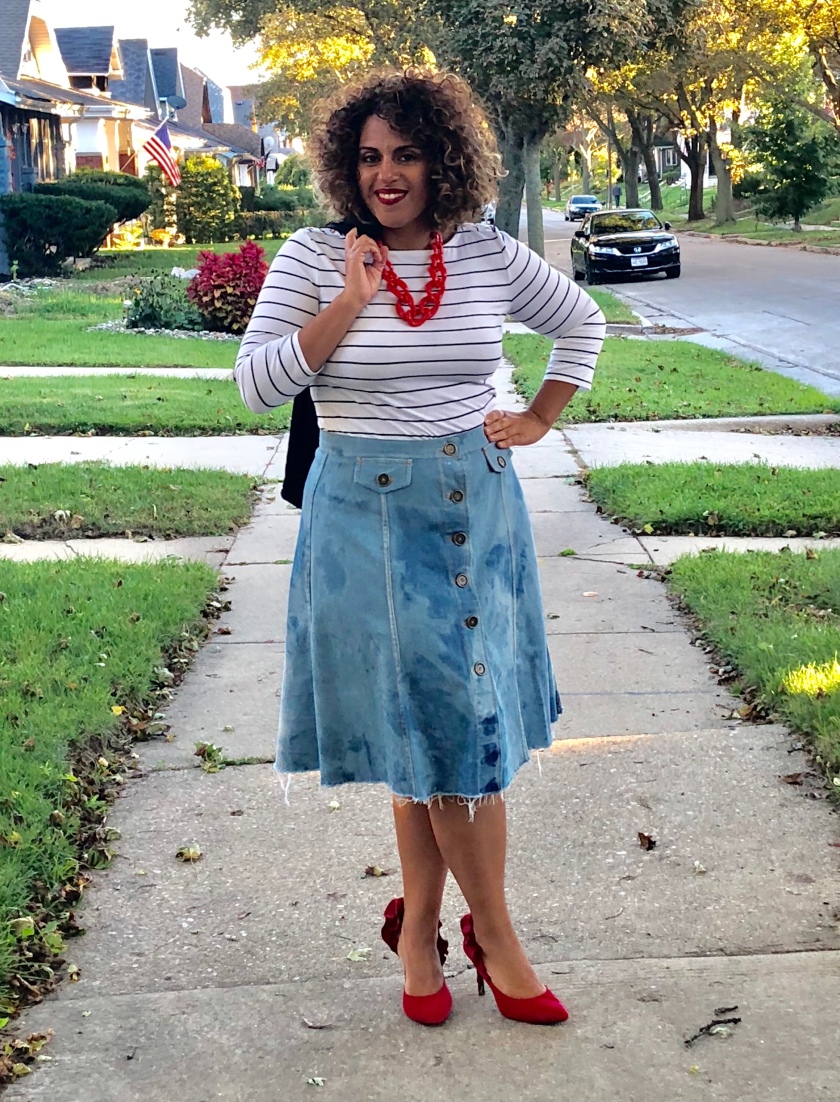
This week’s post is my version of the #lenahornedress from Tabitha Sewer I was sew lucky to have won this pattern along with a whole bunch of sewing goodies from D&H fabric Co.’s  one year anniversary give away. I mean seeeeewwww much was in there! From fabric to sewing notions, earrings and even a DIY shoe kit from A Happy Stitch. I’ll be sharing what I make with these gifts over the next few weeks. Stay tuned!

So like I was saying…. The lenahorne dress pattern from Tabitha Sewer was one of my gifts and I decided to do my own version of it and share some of my thoughts on this pattern.

Pattern Review

The pattern instructions were very straight forward and easy to follow. I liked the method of construction that she used to sew the dress together. In particular the zipper insertion to the lined bodice was great! No need for hand finishing. It was completely inserted by machine. Which was such a time saver!

I like that she uses ready to wear measurements and sizing making it so easy for sewers to choose their correct size. I also liked the inclusivity of her pattern sizing. Sizes start at a 0 and range to a 24.

Fit and Design Modifications

The pattern for me fit true to size.  I am a ready to wear size 14 and I cut a pattern size 14 and it fit perfectly.  The only adjustment that I had to make was in the high bust. I had to pinch about 1″ out at the princess seams.

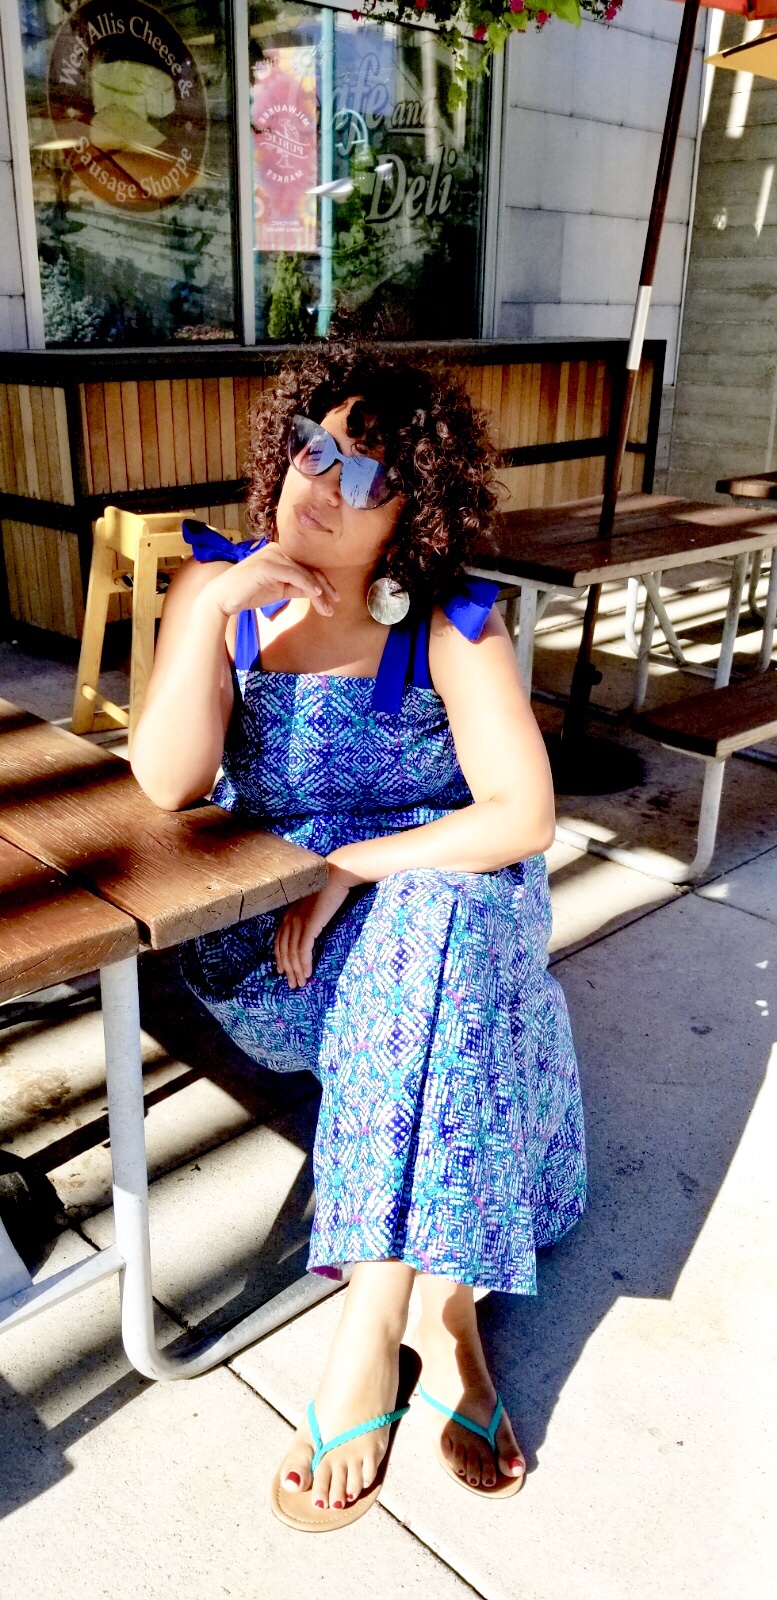
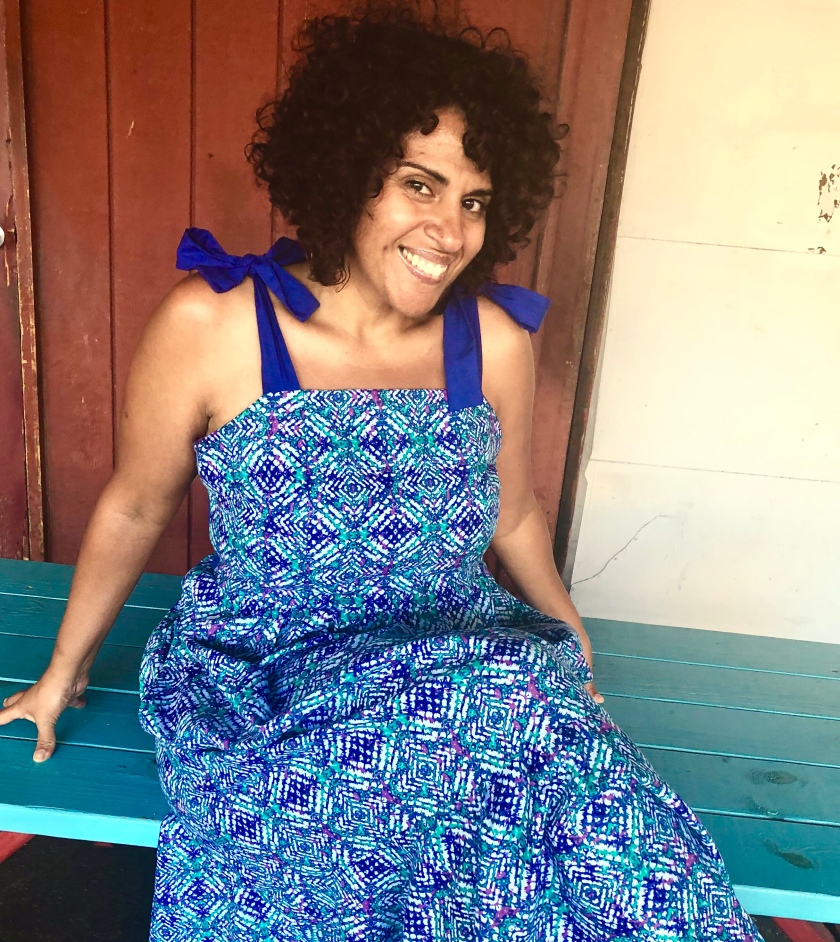
I’m not such a ruffles kind of girl so I opted to leave out the ruffle detail opting for straps that tie at the shoulders. For the shoulder straps I simply used the straps that were included in the pattern and cut an extra set of 2.  The other change that I made was in the skirt. I lengthened the hem by creating a peplum. Below are some brief instructions for how I created the peplum.

1) I traced view B of the dress’ skirt pattern (it reaches above the knee) to a separate sheet of pattern paper. (you can use butcher paper, tracing paper, tape printing paper together or even newspaper if you don’t have pattern paper).

2) I marked a series of lines 2-3 inches apart along the length of the skirt pattern.  Then using the slash and spread method I cut along the lines from the bottom all the way to but not through the top of each line. Leaving a hinge at the top to spread the pattern.

3) I then placed another large piece of pattern paper underneath the now slashed skirt pattern.  Evenly spreading and taping each slashed area to the paper underneath. This gave me the fullness only at the hem. I didn’t want a ruffled hem. I wanted a peplum.

4) Lastly, I remarked the hemline and cut the new pattern piece.

Fabric and Styling

I was on a tight budget this time around and I wanted to make a casual dress that I could wear in the hot summer August days ahead.  So I shopped the clearance shelves at Joann’s and found this shades of blue batik fabric that has a hint of purple and aqua running through it.  I broke up the print and created contrast by using a solid cobalt blue for the back bodice and straps.

I kept styling minimal with these aqua colored flip flops and shell earrings that picked up the blue and purple tones in the dress.  Another fun styling option would be to accessorize with pops of yellow with shoes and fun boho vibe earrings.

This was a fun impromptu shoot.  I was hanging out with one of my besties in Downtown Milwaukee at the Public Market.  We had lunch, chatted the afternoon away and decided to walk and take a bunch of selfies.  Before we knew it people were coming up to us asking if we wanted assistance taking pictures.  It was so nice to witness and receive kindness.

img_4598

img_4606

Well thats all for now everyone!  Until next time…..!

blog signature


DIY Poncho Wrap Top Tutorial

And we know [with great confidence] that God [who is deeply concerned about us] causes all things to work together [as a plan] for good for those who love God, to those who are called according to His plan and purpose.” Romans 8:28 (amp)

Hello Lovelies!

Its a great day!  The weather here in Milwaukee is starting to break and i’ve been experiencing a series of challenges and triumphs the past few weeks.  I’m so thankful. I am really hanging onto my faith and trying to see things from the glass half full mindset.

As for this weeks post. My DIY Wrap Top Tutorial is about a week later than I promised but I finally got it done yesterday and I like it.  I hope you do to.

It’s a pdf technical sketch pictorial with both cutting and sewing directions.  This is a great beginner friendly tutorial that requires no pattern and I was able to complete quickly.  Less than 2 hours.  You can download your copy of the tutorial in the link below.

DIY Wrap Top Tutorial

If you missed last week’s post where I went into further detail and shared my styled photos you can catch up here.

Let me know what you think and if you make it I’d love to see your version of it.

Well that’s all for now! Until next time….

blog signature

DIY: Holiday Sequins Pencil Skirt and Tips for Sewing w/ Sequins

Hello Everyone!

I pray all is well with you.  It is December already and no doubt many of you have holiday office parties to attend.  I’ll be honest with you.  I can’t remember the last time I went to a holiday party and I have never worn sequins prior to today’s post.

If you know me.  I like to keep things casual.  I’m not huge on evening gowns or overly glamorous oufits.  I do however, love the way designers are bringing sparkle to our everyday lives through sequins.  The incorporation of luxe fabric like velvet and sequins into ready to wear day looks inspired today’s make. Below are a few examples of my inspiration.

I thought it would be fun to make a stretch sequins pencil skirt.  I liked the idea of creating a holiday inspired piece that could stretch into the new year.  This skirt would be lovely and very appropriate at an afterwork holiday party and could be easily worn after the holiday season for a date night with your sweety!

This is a self-drafted pattern that I created using an existing knit pencil skirt. Its high-waisted and has a black elastic waistband.  I also added a lining made from some nude powermesh that I had in my stash for ages.  A little quick tip with the lining.  I like to cut my knit powermesh lining a 1/2 inch smaller than the outer skirt.  It gives a little compression and smooths out your curves nicely.  The sequins I purchased from Joann Fabric.

I chose to keep it sleek with a black blazer, black tank top and suede stilleto boots.  I added a little extra bling with these rhinestone black/gold tassle earrings.  I wanted the sparkle of the beautiful blue sequins to be the star of this outfit.

I also included a few tips that I learned from sewing with sequins below the pictures. I hope you find them helpful.

Tips for Sewing w/ Sequins

  1. Use lots of pins to pin your pattern down.  Those sequins are slippery.  I also used a very sharp rotary blade to cut my pattern instead of scissors. Made it easier to keep the fabric from shifting.
  2. Depending on how bulky your sequins is you may have to remove the sequins from the seam allowance prior to sewing your sequins.  Mine wasn’t so bad and I was able to cut it and sew without removing any of the sequins.
  3. Use a very sharp micro-tex needle.  I used a size 80 microtex needle. This went through my fabric easily without skiping stitches or thread breaking.
  4. Use an all purpose thread in a matching color.  I used a zig zag stitch and followed up with a straight stitch because it was a knit fabric and you could see the thread through the side seams.  Going over the seam a second time with a straight stitch helped tremendously.
  5. Hem your garment by hand.  I top stitched my pencil skirt hem but wish I would have hand finished the hem. It stretched out my hem a little bit.  Not too noticeable.

Well, that’s all for now! Until next time!

xoxo,

♥ Iris

DIY Upcycled Faux Fur Mittens and Tips for Sewing with Fur

“Let the peace of Christ [the inner calm of one who walks daily with Him] be the controlling factor in your hearts [deciding and settling questions that arise]. To this peace indeed you were called as members in one body [of believers]. And be thankful [to God always].” Colossians 3:15 (amp)

Hello Everyone!

Happy Thanksgiving!  I hope you all are enjoying your holiday.  This is my favorite time of the year.  I always look forward to the holiday meal preparations and family gatherings.

Today’s post is dedicated to the DIY gift makers.  A few years ago I made a bunch of fleece lined mittens from upcycled wool sweaters for the men in my family. They were a hit.  I thought about making them again when I realized that we might be in for a pretty frigid winter this year.  However, I wanted to give them a twist.  While I like how warm and economical it is to make them from wool sweaters.  I wasn’t esthetically feeling some of the wool sweaters that I was finding. They were a bit ugly or dated.

Then came an idea to try and source other kinds of wool fabric to make the mittens from.  I wanted them to still be warm and wondered if I could use an old wool suit or something like that.  I began to surf pinterest for ideas and tutorials but really couldn’t come across anything.  Then the other day the kids and I were in Target and I found these fun kids mittens made from bright blue, red and pink faux fur.  They were so cute.  They reminded me of cookie monster, elmo and cloe from Sesame Street.  The kids loved them.  So the idea eventually came to me to create my own furry version of a sweater mitten.

I found this beautiful black merino wool and angora sweater at the thrift store for $2.50.  It was the perfect weight and super soft.   

The faux fur I had in my stash from another project and I lined it with fleece that I had from some bath robes that I made the kids.

It took me a while to work out the design of this project and its still not perfect. But I liked the first go round.  I will say this project will work better with a short pile fur.  This fur is long and was meant to be used on a collar of a coat I was making.  But I didn’t want to spend a bunch of money on this project so I just gave the fur a hair cut.  They look like chubaka and pepe le pieu had a baby lol! But I think they are fun a bit glamorous and 100% warm.  Just what every single woman who has snow shoveling duty needs in her life!

I also thought is was a great opportunity to give a few tips for sewing with fur. Below are some pictures and quick tips.

  1.  Never cut into the fur. It will cause a lot of shedding. Instead turn the fur over so that the knit backing is facing you and the fur is touching the surface of your cutting table.
  2. Place your pattern on the knit backing and using a marker trace your pattern onto the backing of the fabric.
  3. Use the tip of your scissors or even better a box cutter and cut just through the backing of the fabric (not the fur) along the traced pattern line.
  4. Once done.  Shake out all of the loose fur and pin your pieces together trying to keep as much fur out of the seam as possible.
  5. After you sew your seams together you may have to trim some of the fur on the inside and outside of your fabric at the seams.
  6. Never press faux fur.  You will have to press the seams down with your hands or a hammer.

Thats it.  Super simple. The pattern maker in me wants to work out the kinks in my pattern and play with fabric ideas.  So stay tuned.  You may see more improved versions of my furry sweater mittens.  Until then enjoy the rest of your day!

xoxo!

❤️ Iris

Pattern Hack Tutorial: DIY Puff Sleeve Peplum Top Using McCalls 7722

You can download and print the free pdf illustrated copy of the tutorial 

“An excellent woman [one who is spiritual, capable, intelligent, and virtuous], who is he who can find her? Her value is more precious than jewels and her worth is far above rubies or pearls.”

Proverbs 31:10 (amp)

Hi Everyone!

Happy Hump Day! I want to thank everyone for all of your comments and kind words from yesterday’s post.  It always keeps me encouraged.  Today’s post is short and sweet. As I mentioned yesterday I created a pattern hack tutorial for the peplum portion of this top.  If you missed yesterday’s post you can catch up here.

img_0746

This was a fun make and creating the peplum wasn’t hard at all.  I basically created rectangles using my desired measurements and used the cut and spread method of patterning to create the fullness for the peplum.  You can download and print the free pdf illustrated copy of the tutorial by clicking on the link below.

Puff sleeve peplum top tutorial

If you make it and have questions feel free to reach out to me I’d love to help. And would love it even more to see your finished version.

That’s all for now.  I hope you have a great rest of your week. Until next time.

XOXO!

❤️ Iris

Pattern Hack Tutorial: Asymmetric Pencil Skirt

For today’s post I created a step by step illustrated tutorial for how to draft a pattern for your very own version of this project.

But as for me, I trust [confidently] in You and Your greatness, O Lord;
I said, “You are my God.” Psalm 31:14 (amp)

Hello Everyone!

Thank you so much for all the love and comments that I received for my Sew the Look: Asymmetric Pencil Skirt.  If you missed it you can catch up here.  Pattern Hacking is a new term for me but as I began delving into the world of sewing blogs I realized that it is a term used to describe how to alter a pattern in order to create another design. Actually in fashion school that is all we learned how to do.  You start with what’s called a sloper or block and you manipulate the pattern into the design that your creating.

For this particular project, I used Simplicity 8394  because it was very similar to the skirt that I wanted to make and I knew I could make it with very few pattern adjustments.  However, the great thing about this skirt project is that you can make it using a well fitting pencil skirt pattern as well.

For today’s post I created a step by step illustrated tutorial for how to draft a pattern for your very own version of this project. You can use simplicity 8394 if you like, but for this tutorial I show you how to make the pattern using a pencil skirt. Below is an image of what the illustrated tutorial looks like. You can also download the pdf copy of the  asymmetric skirt pattern hack tutorial here.

assymetric pattern hack tutorial

Please note that this is a patterning tutorial and not a sewing tutorial. It assumes that you have previous sewing knowledge and that you are familiar with using sewing patterns.

Well thats all for now!  Until next time….

xoxo!

Iris

DIY distressed denim skirt using simplicity 8019 and tutorial

“I can do all things [which He has called me to do] through Him who strengthens and empowers me [to fulfill His purpose—I am self-sufficient in Christ’s sufficiency; I am ready for anything and equal to anything through Him who infuses me with inner strength and confident peace.]” Philippians 4:13 (amp)

Hello Everyone!

Happy Friyay! Woohoo! we made it through another work week!

I love the skirt that I made this week. I used simplicity 8019 view c it’s a 1970s reproduction. I Love vintage 70s patterns and since 70s fashion is trending for fall I thought it was only appropriate. I had fun making this one. It was a great pattern to work with.

I also love this skirt because it gave me an opportunity to distress the denim using a tutorial from @elicat_diy. I love her work! You should check her out!

I also love textiles and outside of knitting or crochet creating my own textiles is not something I’ve delved into yet.

But when I finished making the skirt I felt like the original dark denim was too simple. Below is a picture of the original color before I distressed it.

I had finished the seams using a flat felled seam in a contrasting gold colored thread thinking that the top stitching would be enough. Yet it felt like it needed a little something else to make it pop! So came the idea and opportunity to play with distressing the denim.

You can click here to see the tutorial that I used. It was great, and had plenty of pictures to help you follow along easily. The only modification that I made was to not tea/coffee stain my skirt after I pulled it out of the bleach solution. I liked the color of my skirt fine and didn’t think it needed it.

In addition to distressing the denim and finishing the seams with a flat felled seam, I added a faux flap welt pocket that I self drafted a pattern for. I also decided to leave the hem raw to compliment the distressed fabric.

I styled the skirt with a casual Friday office theme (hence why your getting a Friday post!) I love jeans and a blazer and used that as inspiration to create this look. The weather is starting to transition into colder fall weather so I wanted to squeeze in one more transitional summer/ fall look before I have to bust out the tights and knee boots to stay warm under my skirts lol!

Well that’s all for now! Until next time! Have a great weekend everyone!

xoxo,

❤️Iris

DIY Skirt Making 101 Series: Fabric Selection (Video)

“Now the Lord is the Spirit, and where the Spirit of the Lord is, there is liberty [emancipation from bondage, true freedom].” 2 Corinthians 3:17

Hello Everyone!

I hope your week is off to an amazing start!  I am so excited as I have been working hard sewing skirts while trying to figure out the world of video tutorials.  I’m not 100% there yet but my daughter and I have been trying to figure out how to edit in imovie and i’m still trying to figure out the overhead tripod situation.  In the meantime I was able to video record this short tutorial about selecting fabric with my iphone tripod.

This week I decided to spend a little time discussing proper fabric selection.  One of the biggest mistakes that many new sewers make is choosing the wrong fabric for their projects.  Skirts are a great beginner sewing project and choosing the right fabric only adds to the success of your finished masterpiece.  In this short tutorial i’ll show a very easy and straight forward way to guide the fabric selection process.

Just click below!  and i’ll see you later this week with my latest make.  Its pure cuteness! and I can’t wait to share it with you all!

♥ xoxo!

Iris


DIY half circle skirt tutorial

Hello Everyone!

I hope your week has been going super! Thanks so much to everyone who liked and commented on Monday’s skirt post. If you missed it you can click here and read all about it.  I really do love the skirt.  So much so that I wanted to put together a quick tutorial on how I made it.

If you are new to circle skirts.  They over all are a quick make and really don’t require a pattern.  You can fold your fabric and draw it on with a tailors chalk or wash away pen, cut and sew.  The biggest thing is finding the radius of your waist measurement.  There is an actual formula that requires simple high school math.

You do this by dividing your waist measurement by pi (or 3.14) and round off your answer to the nearest quarter of an inch.

my waist is 35″ + 1″ for fitting ease= 36″  divided by pi (3.14) = 11.46.  So the radius of my waist measurement is 11.50″

If you opt to use this method.  You can add your seam allowance after you draw out your skirt as I illustrate in the tutorial.  Or you can simply add your seam allowance to your waist measurment.  i.e. waist =35+ 1″ fitting ease+ 1/2″ seam allowance per seam (4 seams) = 38″.

The other and easy way to find your waist radius is to use a circle skirt calculator. My favorite one is from By Hand London.com   I love it because it includes your seam allowance for you (if your making a 2 seam skirt. If you want to add a back seam you have to make sure to increase your waist measurement by your desired seam allowance) as well as gives your length measurement for a mini, midi, or maxi length.  Here’s the link to the app. Its a handy little tool that I use alot.

Once you’ve figured out your radius and desired length you can follow along with the tutorial that I created in Adobe llustrator below.

Supplies: 

  • Fabric of choice 
  • Pattern/butcher paper
  • Measuring tape 
  • push pin or thumb tack 
  • pencil
  • scissors

half circle skirt tutorial 1

  • I forgot to note that the 90 degree angle should be longer than your desired skirt length.


2 circle skirt tutorial 2

Voila! that’s it.  Once this is complete draft a waistband using your waist measurement and desired width and add seam allowance.  Cut and sew.

I hope your inspired to go out and make your own half circle skirt!

Until next time!

xoxo

Iris


DIY Skirt Making 101 w/ free pdf skirt measurement chart

Skirts are probably one of the easiest garments to make and fit as it requires minimal measurements. 

So in Christ Jesus you are all children of God through faith, 27 for all of you who were baptized into Christ have clothed yourselves with Christ.”  Galatians 3:26-27

Hello Everyone!

I pray all is well with you!  I am so behind on posting. Life has been full of soooo many amazing blessings and while I am thankful, those blessings have been keeping me busy.  Like getting my new house ready so my children and I can move in (yaaay!).  Add to that list my daughter fracturing her ankle in a roller skating accident.  Yet in between it all, I have managed to make my first skirt project which I’ll be featuring next week.  Can’t wait to share it with you!!!

For this week however, I wanted to introduce skirt month by spending sometime writing a post that would set the foundation for this series.  Each week in addition to sharing my DIY skirt makes with you I will also share in a seperate post a more in depth explanation of some aspect of skirt making.  For this week I created a free pdf download of a skirt measurment chart.  So here it goes…

DIY Skirt Making 101

Introduction

Skirts are probably one of the easiest garments to make and fit as it requires minimal measurements.  A beginner sewer young or old can make a simple gathered skirt with an elastic waistband in just a few hours.  They are a fun,versatile garment with many styling options making it a great wardrobe staple. Keep reading for for a brief description of skirt construction.

Measurements

Skirt measurements are few.  For a basic straight or pencil skirt, all you need is your natural waist , full hip and length from natural waist to desired length of skirt. If your making a full skirt like a circle or pleated skirt all you need is your waist measurement and desired length. Below is a brief description of how to take your skirt measurments and you can click on this link  Skirt Measurement Chart. to download and print your copy of the skirt measurement chart to use as a tool to record your body measurments.

Natural waist= take a piece of string or yarn and tie it firmly (not tight) around your waist. Bend your torso from left side to right side a few times until the string settles to your natural waistline.  This is the measurement that you want to take.

Natural waist to full hip= This the measurement starts at the natural waist and measures down to the full hip.  For most misses sized women it is about 9inches.  If you are a pear shaped or plus sized this number will most likely be greater.  I am a pear shaped sized 14/16 and my full hip falls about 11inches down from my natural waist.

Full Hip=  The full hip is where the widest part of your hip is on your body.

Length=  This is going to be based on your personal preference and skirt style.  The key here is to measure from your natural waist to your desired finished skirt length. Below is an image that I found on Pinterest of the various skirt lengths and their names.

skirt lengths

Basic components of a skirt

Like I mentioned earlier, skirt designs vary but all skirts have a waistband or facing, the body of the skirt, a hemline and elastic or a closure like a zipper, snaps, buttons etc.

Supplies needed

  1. Measuring Tape
  2. Fabric of Choice
  3. Interfacing or elastic (if making an elastic waistband)
  4. Sewing thread
  5. Closure of choice (zippers, buttons, snaps are the most commonly used)
  6. Sewing machine
  7. hemming tape or wash away tape (not necessary but can be useful with hemming).

Skirt Styles

Once you understand how a basic skirt is constructed the possibilities are endless.  Below is a chart that I found on pinterest that illustrates some common skirt styles.  This skirt series will focus heavily on skirt construction and not design.  However, I hope to feature a few projects toward the end of the month that demonstrate some basic skirt design options.

4e2feb9ea69fafaea22b0589bc430dde

Fabric options:

There are a variety of fabrics that make a great skirt.  It really depends on the skirt style and look that you are going for. The easiest way to begin to familiarize beginner sewers with fabric is to purchase commercial patterns. All patterns list the recommended fabric on the back of the pattern envelope. I think this is a great place for beginner sewers to start.  Below I have listed a few of my favorite skirt fabrics.

  • Mid-weight cotton
  • denim
  • stretch sateen
  • light to mid weight twill
  • wool 
  • rayon
  • ponte knit

Closures:

A basic skirt with a waistband uses a zipper.  Some skirt styles like a jean pencil skirt for example may have a button placket going up the front of the skirt.  This is an example of using a closure for both aesthetic and construction purposes.  The exception is usually a skirt that has an elastic waistband or a skirt made from a knit fabric as the elasticity of the waistband and the fabric allow the fabric to easily come on and off the body.

Well there you have it.   A basic introduction to skirt construction.  Pretty straight forward right? Make sure to stay plugged in for the rest of the series.  Each week i’ll be posting all of my DIY skirt makes and will go more in depth about each aspect of skirt making!

Have a great week everyone! Until next time!

♥ xoxo

Iris